Changing the engine mounts is a fairly simple concept, however knowing some tips and tricks makes the process a lot quicker.
I found it easier to lift the engine and change one mount at a time. I did not have to lift the car to do this job.
Both sides:
Undo the top nuts of the engine mounts.
1. On the passenger side you will need to remove a heat shield that goes right above and behind the mount. There are two 10mm bolts/nuts holding the shield in place. Undoing one bolt/nut was enough for me to swing it out of the way.
2. I was unable to get a wrench of socket to fit from underneath in a way that allowed me enough leverage. From above you will need a u-joint socket and a few extensions. I had roughly a foot of extensions that allowed me to fit a breaker bar free and clear of the engine/coolant tanks/washer res.
3. On the drivers side remove the air flow meter, this will allow you to work with the engine mount from above very easily.

Passenger side (on a left hand drive vehicle):
1. Lift the engine by the AC bracket on the passenger side of the vehicle from below, this bracket is very strong and can handle it. I was not able to find a picture of the bracket but its attached to the AC unit and the AC unit is here:

2. Having lifted from this point, you will notice the engine lift off the mount. Once high enough pull the mount out after undoing the bottom mount nut from below.
3. Put the new mount in, but do not put the nuts back on.
4. Slowly lower the engine and help the mount accordingly to stay in the bottom and top holes.
5. You should lower the engine just enough to the point where the engine is not yet touching the engine arm, but almost.
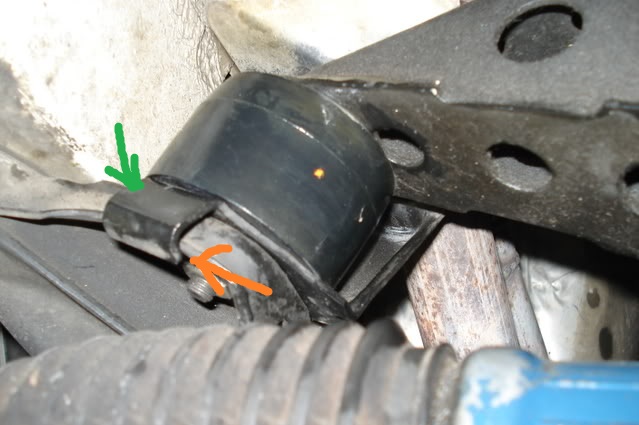
6. From below tighten the nut while guiding the alignment pin into the associated hole. Also make sure the green lip is over the ledge as shown by the orange arrow.

7. Once tight drop the engine back onto the mount.
8. Then redo the top nut
Driver side
1. Put a piece of wood between your jack and the oil pan (to distribute the load) and jack the engine up from the right side of the oil pan. This in turn will raise the right side of your engine.
2. Lift until it is possible to take the mount out. Undo the bottom nut and take the mount out.
3. Slowly lower the engine and help the mount accordingly to stay in the bottom and top holes.
4. You should lower the engine just enough to the point where the engine is not yet touching the engine arm, but almost.
5. From below tighten the nut while guiding the alignment pin into the associated hole. Also make sure the green lip is over the ledge as shown by the orange arrow.

6. Once tight drop the engine back onto the mount.
7. Then redo the top nut
Interesting fact: The production years are molded into the rubber on the old and new mounts. You can see just how old your old mounts were, and when your “new” mounts were made.


Recent Comments