
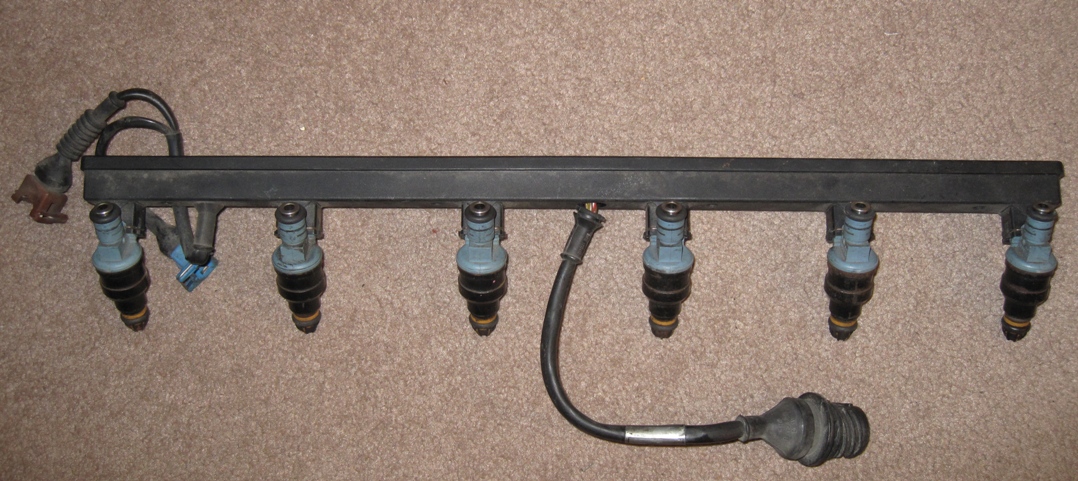
From 1989 forward; M20 engines (325i, 325is, 325ix, 325, 325e, 325es) used what were called injector harnesses for the fuel injector connectors.
Prior to 1989 M20 engines used individual two prong connectors for each individual injector.
There are three main benefits to the later harness, the first benefit is that the later harness has a central connector that can be disconnected when removing the intake, or the head while the intake is still connected as opposed to pulling through each connector on the early harness. Another benefit is that you will not be able to mix up the connectors to the corresponding injector since they are on a metal bar. The early injector connectors have little ribbons indicating which injector they belong to, however over time these tend to fall off and I encourage those removing the connectors to label each one for easy reassembly. The third benefit is that if something chips or breaks on the later harness you can easily replace it by screwing in a new rail. On older harnesses this is not possible because the wires are tied directly into the engine harness.
Sometimes the connectors become stubborn to remove after being connected to the original injectors for over 20 years, and sometimes the plastic plug will break. When this happens what many people do is they go to the junkyard and cut off a connector and then solder it on after cutting the old broken on off. I advise AGAINST this for a few reasons. The repair kits are still available from Bosch, they are cheap, readily available for order online, are new and not brittle, and most importantly do not require soldering which will keep your harness original.
The repair kit part number from Bosch is 1287013003:
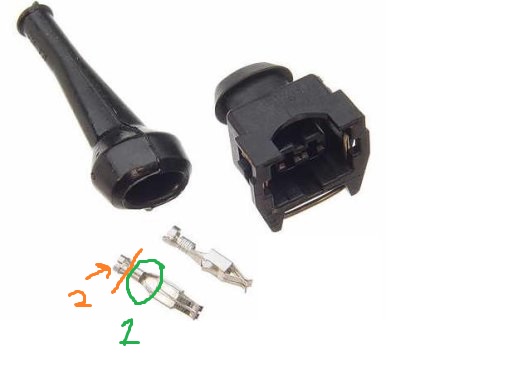
The way you use this repair kit is by first cutting the old broken plug off, which will leave you with two wires. You strip those wires, and then crimp the little metal connectors to them. The orange clamp labeled #2 is a jacket relief, it will be crimped to the NON-STRIPED part of the wire. everything past this point should be stripped and will be crimped by the green area circled and labeled as #1.
Although these connectors are slightly different they illustrate the methodology perfectly:

Although there are special pliers called weatherpack pliers to do this job, if you are only doing one or two connectors its generally a waste of money and can be done manually with small pliers, and regular crimps. After you have completed doing this, the metal connectors just slide and clip into the black connector without much force. Once they are in there is no pulling them back out, so make sure you have the appropriate pin in the appropriate side.
Your finished product should look like this:

Lastly do not attempt to swap the late harness to an early car, the benefits of doing something like that will be heavily outweighed by the need to botch the original wiring harness.

Recent Comments